Tuesday, September 29, 2009

The Greatest Artist Ever


The Greatest Artist Ever?  Surely this is a debate that will continue for as long as there is air to breathe.  For me this is a simple answer . . . James Mullen (My Dad) is the biggest source of inspiration as an artist, but more importantly on being a human being . . . For that reason  I put him at the top of the list.  For over seven decades my Dad has thrived on art as if it were a part of his physical body.  Being his son, I have been blessed to inherit this gift the same way someone inherits eye color from their parents.  I have seen my Dad's art in museums amongst the 
"best of the best" and I have seen personalized Birthday cards that could put Hallmark out of business.  Despite having seen hundreds of his works during my lifetime I know for certainty his best artwork has yet to be created.  Keep it up Dad, the best works are still ahead of you.

Love Micah

Friday, September 25, 2009

Falls Lake


Falls Lake and the Neuse River are integral parts of my life.  So much of my artwork is inspired by these areas.  I have seen Falls Lake during droughts and floods, needless to say both offer interesting scenes for an artist.  Falls Lake at Six Forks Road is one of my favorite areas to fish. The painting shown was completed during the height of a drought in the Summer of 2008. Normally the water be up up past the sienna and umber colors that are just above the shoreline. Someone mentioned this painting resembled Fauvism.  I suppose I can see this in some of the broad color grids.  I've always considered my work to be inspired more by pointilism or naive styles.  Maybe amongst these and other styles I will finally figure out what my paintings are all about.  :)

Sunday, September 20, 2009

Seeing Red


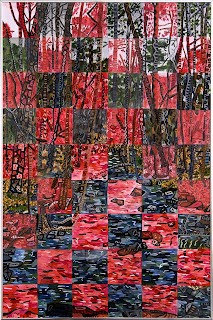
Earlier this Summer I entered two paintings in a show titled Seeing Red at the Visual Art Exchange in Raleigh, NC.  My goal with both of these paintings was to paint approximately half in varying shades of red, with the other half being the natural colors of the landscape as I saw them. In painting Duke Forest I started by sketching a series of squares of the same size.  I intended to create varying squares of red shades next to colors of the natural landscape.  I took this a step further by painting half these squares directly on the glass.  This 24x36" painting took nearly 50 hours, but it is was one of my personal favorites.  

The second painting Linville River was the painting accepted into the show.  In doing this I masked out horizontal and vertical bands and subsequently painted the unmasked area as I saw the natural colors.  When completed I lifted the masking tape and painted the balance of the painting in shades of red.

Comments and criticism are always appreciated.


Thursday, September 17, 2009

Wake Forest Area Artists' Studio Tour


The Wake Forest Area Artists’ Studio Tour is in high gear.  The first weekend was awesome!  Lots of people, great weather and of course great art.  The gals at the Sunflower Studios and Gallery were nice enough to let me show my work there.  My fingers are crossed that the weather will again be nice this weekend as I will once again be under the canopy in the front lawn of the Sunflower.   I’ll be painting this weekend and will be giving away greeting cards to anyone that mentions they heard about the Studio Tour through this blog.  I hope to see everyone this weekend!  Learn more about the tour at http://www.artistsstudiotour.com

Tuesday, September 8, 2009

Using Impasto Medium to Create Three Dimensional Effects

In depicting elements in nature relief effects give a 3-dimensional effect that really makes the paint “pop” right off the canvas.  In this painting technique I am using Matisse Structure paint (Carbon Grey) along with Matisse Impasto Medium to create tree bark.

Step 1:  I mix a ratio of about 30% paint with 70% Impasto Medium.  Make sure the mixture is throughly mixed (I use a palette knife) when complete the mixture should be the color of the paint.

Step 2:  Apply as much masking tape as needed over the area where the impasto mixture will be applied.   In this instance a width of about 4” of tape is used.  I generally use more tape than is actually needed so the excess will catch any spillage in the removal process.

Step 3:  Once the tape is applied I use an Exacto knife to cut out various shapes,  It is important to use a sharp exacto knife and a heavweight canvas, otherwise you risk cutting right through the canvas

 Step 4:  Once the tape is prepared I use a palette knife and begin applying the impasto mixture. I like to use alot of the mixture, the impasto medium can hold peaks of about an inch.  One applied you can use the knife to smooth out the mixture, or you can leave rough or even add some textured details when the mixture is still wet.

Step 5: When the mixture is still wet begin lifting the layers of tape off.  Be sure to lift the layers by the outer layer first, otherwise you risk lifting all the layers at one and creating a mess.

When complete the Impasto mixture will take about 24 hours to fully dry.  During this drying period you can add texture and subtly shape the peaks.  Once dried, the peaks can be painted over just as if they were another layer of paint.

Wednesday, September 2, 2009

A View from my Back Porch

My favorite part of the week is usually Saturday night around 6:00 or so.  After a day of painting or running errands I love to sit out on my deck and enjoy a cigar and a cold beverage.  My deck is elevated about 12’ from the ground so it overlooks my lawn that extends into a wooded area.

The painting shown is a view from my deck.  The lawn and forest area are painted on a 12x16” Gessobord panel.  The planks and beams of the deck are painted on a piece of glass.  Before I framed the piece I separated the glass and the panel with four balsa wood strips that are concealed by the lip of the frame.  The picture shown does not really give the right perception, but if you were to look at the painting from any angle you can really see how the glass is offset from the panel.